DragonBones Getting Started Guide
Peter Huang (@fans8)
the DragonBones team (@dragonbonesteam)
DragonBones Getting Started Guide is released under a Creative Commons Attribution-Noncommercial-No Derivative Works 3.0 unported license.
Table of Contents
- What is DragonBones?
- Features
- Download and installation setup
- Download the source code of tutorials
- Tutorial 1: For designers - Use DragonBones and create skeletal animation in Flash Pro
- Tutorial 2: For programmers - Use skeletal animation in ActionScript projects
- Tutorial 3: Create and control multiple Skeleton animations
- Tutorial 4: Control each bone of the skeleton
- Tutorial 5: Switching texture in skeleton animation
What is DragonBones?
DragonBones is an open source project for 2D skeletal animation. It has a skeletal animation design panel named "DragonBonesDesignPanel" and a 2D skeletal animation library based on ActionScript.
Since the Design Panel is essentially an extension for Flash Pro, it makes possible for designers to build 2D skeletal animation based on the timeline workflow that designers are familar with, and build it with efficiencyFeatures
The animation is based on traditional timeline animation workflow.
Binding bones improves the quality of the animation and make it more accurate and natural. All bones can be controlled by the program dynamically.
Setting the scale and the delay of the animation time for a single bone is possible. This means a living and complex animation can be accomplished with less key frames.
The whole animation is made up of several pieces and each piece has its own tween effect. This structure will have much less bitmap and memory consumption comparing to "sprite sheets, sequence frames based" animation approach.
The view part and the logic part of the skeletal animation are separate. And the view part of the skeletal animation can be changed dynamically without any impact on the animation playback.
Animation by the project can be easily used in traditional DisplayList, the Starling framework and other technologies for 2D applications.
Download and installation setup
The project address: http://dragonbones.github.com
Get the Adobe Flash Pro 5.5 or above version from here
-
Download the latest release version of DragonBones to get and install the Design Panel, an extension for Flash Pro called "SkeletonAnimationDesignPanel.zxp" , and get the AS3 skeletal animation library in folder SkeletonAnimationLibrary.
-
In following tutorial, we will guide you how to design and implement the animation.
Download the source code of tutorials
Next we will introduce how to use DragonBones with several simple examples.
Please download the related source code from here.
Tutorial 1: For designers Use DragonBones to create skeletal animation in Flash Pro
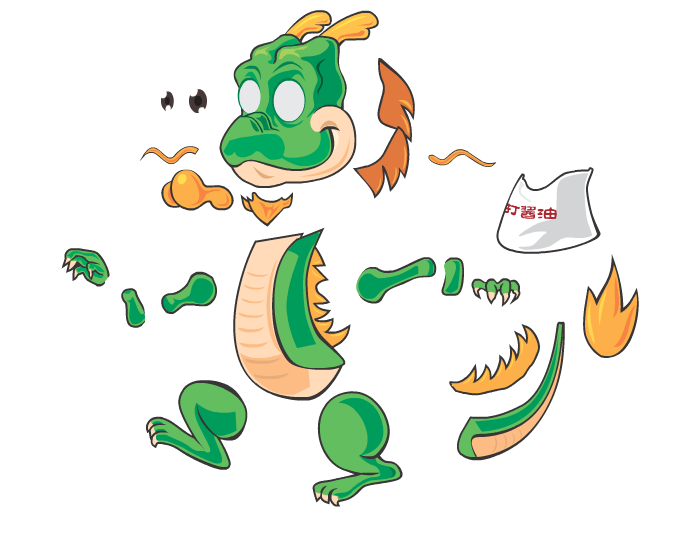
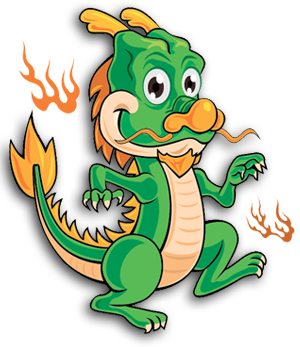
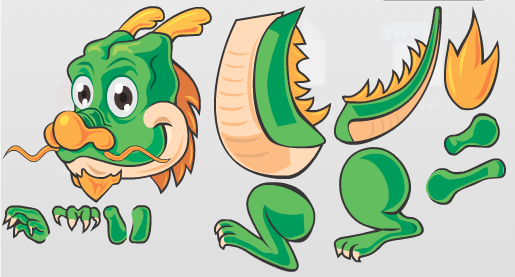
As a designer, all you need to do is to prepare all the parts of the cartoon character. Then, in the Flash Pro timeline editing view , assemble them properly,and set the key frames and use the design panel of DragonBones to get everything done.
After download and install the design panel, start the Flash Pro and open the "DragonBones_tutorial_Start.fla" file in source code package.
-
Open the library panel in Flash Pro and you can see the related symbols for this example.
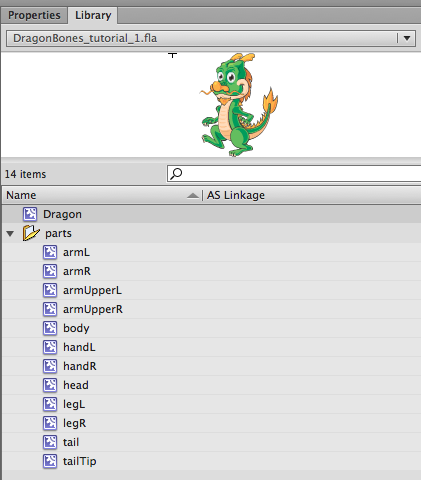
The "parts" folder contains all the elements that the animation "Dragon" is made up of. You can guess which part of the dragon it is by reading the name of each element. Naming a element clearly is a good practice, isn't it? :)
-
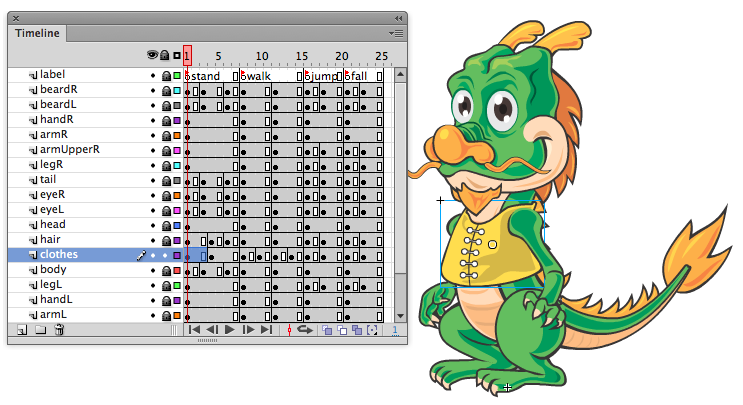
Double click the MovieClip "Dragon" in the library panel to enter the edit mode. We need to understand how this animation is structured, which can help edit the skeletal animation later.
Pay attention to the name of each layer in the timeline because we name them as the related part of the skeleton. The design panel of DragonBones will recognize all the parts of the skeleton automatically according to the name of layers.
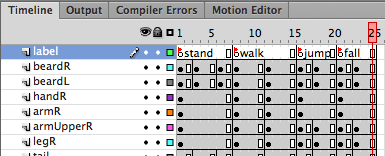
You should also note the layer named "label", where we add the label "walk" to indicate the motion of current timeline. If there are more than one motions, you will need to add more labels in corresponding position of the start frame. Label layer should be always on the top. This is very important! The design panel will read and set motions by these labels.
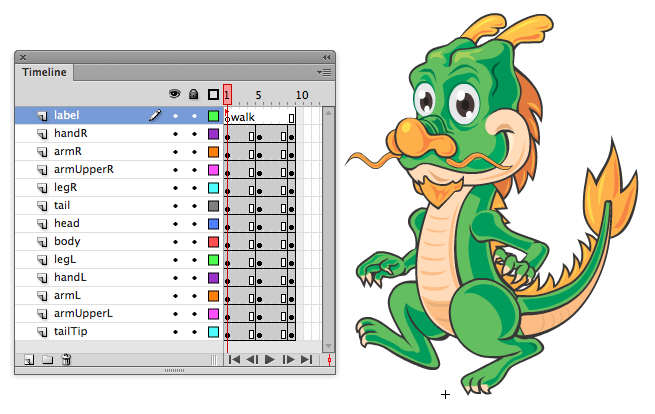
You may ask why there isn't any tween in the timeline? Yes, all you need to do is to set key frames on the timeline and the rest of the work will be accomplished by the design panel.
As a designer, you may have added the tween in your animation, no worry, the design panel can import the animation as what it is designed. (The current version of DragonBones only supports classictween. New kinds of tween will be supported in later version)
-
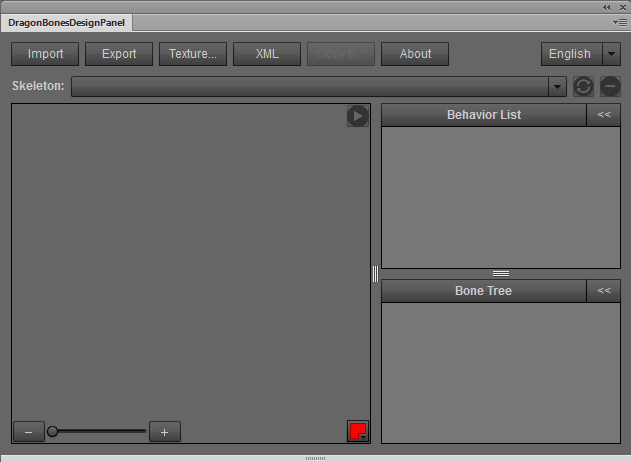
After getting all of the requirements above ready, you can click Window>Other Panels>SkeletonAnimationDesignPanel in the Flash Pro menu to open the design panel. We will explain the details about the usage of design panel in following steps.
-
Click the "import" button in this panel, then you will see the following pop up window:
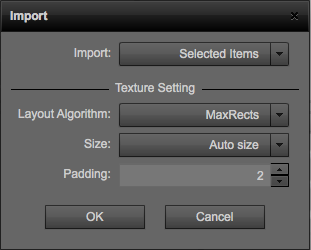
In the "Import" window you can set the layout of the texture, texture size and texture padding. In the "Import" option you can import the selected elements in library, or all the elements in symbol library , or the PNG/SWF/ZIP files exported by the design panel.
Select the MovieClip "Dragon" in library panel, then choose "Selected Items" item in design panel , and Finally click the "OK" button.
-
After importing the MovieClip "Dragon" to the design panel you will see the updated UI like following:

Armature List: List of imported movieClip. Each element in this list has the same name with the corresponding MovieClip in library and the program will use this name to create the animated object. Each MovieClip containing motions is called "Armature" in DragonBones.
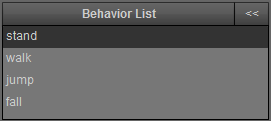
Behavior List: Motion/Behavior names of corresponding animated objects. The name are got from the label name in the MovieClip and will be used by programs to play motions.
Bone Tree: The skeleton structure of animated objects. The name of each item is same with the name of related layer in the MovieClip.
Texture List: The texture name that is associated with each bone.
-
For each motion, you can also set the preferences like this:
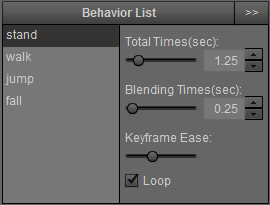
Total Times: Duration of the selected motion. The larger the number is, the slower the motion goes.
Blending Times: Number of tween frames needed to switch from one motion to another. For example, there is a motion called "going down" which has only 1 frame in timeline, but if you set this parameter into 6, then the program will add addtion 6 frames long tween to make the switch more natural when there is a switch from one motion to the "going down" motion.
Keyframe Ease: The ease value between key frames within a motion.
Loop: Decide if the current motion should be played repeatly. Such as the "walk", "run" motions of a character.
-
After setting the parameters above, you can see the updated animation in the preview window which is in the bottom left of the design panel.
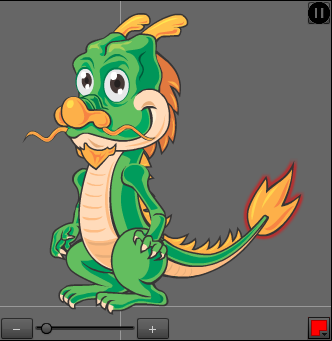
The button located at the bottom left corner of the preview window can scale the object to view it conveniently.
-
OK, now we will set the subordination relations between bones in Bone Tree . From the graph below we can see that in default bone tree view, all bones have no relationship with each other:
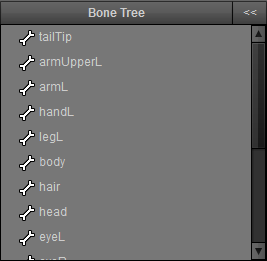
At the top right of the panel you can set the highlight color of the selected bone in the preview window.
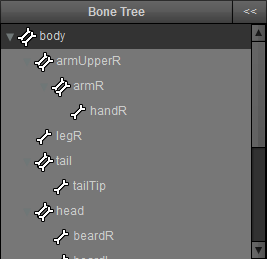
In the list we can attach one bone as a child to the other bone by dragging it. As you see below, we set the body as the major bone and the head, tail, upper limb and lower limb as the children of major bone. The upper limb contains upper arm and lower arm as its children at the same time. By the tree structure we can see directly the subordination relation between bones.
-
We can set the motion parameters for each bone individually. Just select the bone you want to modify in the "BoneTree" panel and set these parameters:
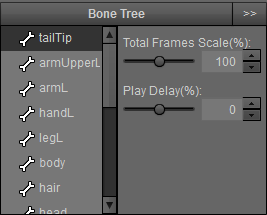
Total Frames Scale: Set the scale of the total frames of current bone relative to the total frames of the motion
Play Delay: Set the delay of current bone get started , relative to the motion it belongs to
Be careful for these two parameters. After fine tuning of these two parameters, you will find that even there are only 2 key frames in the timeline, the motion of the character can be very complicated.
In this example, we set the "Tween Delay" parameter of the tail to the number -10, and the tail tip to the number -50. Then you can find that the dragon's tail wag along the motion of body naturally. :)
-
After adjusting the skeletal animation well, you can click the button "export".
There are many kinds of file format for export to meet your project requirement at the pop up list of "Export".
SWF (Data Merged): SWF file format that contains the skeletal animation data with the type of AS3Obj. If you need vector based the skeletal animation , you can choose this type of format. Of course, the original format of your assets must be the vector based. PNG(XML Merged): PNG file format that contains the skeletal animation data with the type of XML.
PNG (Data Merged): PNG file format that contains the skeletal animation data with the type of AS3Obj.
Zip(XML and SWF): Export the XML file and SWF file packed into a Zip file to store the skeletal animation and the visual resource individually.
Zip(XML and PNG): Export the XML file and PNG file packed into a Zip file to store the skeletal animation and the visual resource individually.
Zip(XML and PNGs): Export the XML file and PNG files packed into a Zip file to store the skeletal animation and the visual resource individually. There would be an individual PNG file for each bone.
Zip(JSON and SWF): Export the JSON file and SWF file packed into a Zip file to store the skeletal animation and the visual resource individually.
Zip(JSON and PNG): Export the JSON file and PNG file packed into a Zip file to store the skeletal animation and the visual resource individually.
Zip(JSON and PNGs): Export the JSON file and PNG files packed into a Zip file to store the skeletal animation and the visual resource individually. There would be an individual PNG file for each bone.
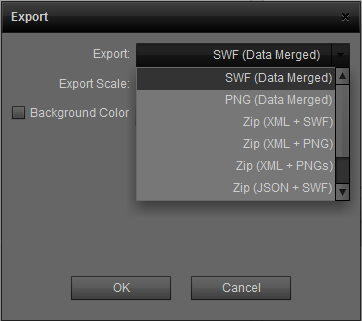
Background Color option is not marked defaultly. That means exported texture atlas's background is transparent. You can mark the option and choose a color as the exported texture atlas's background color.
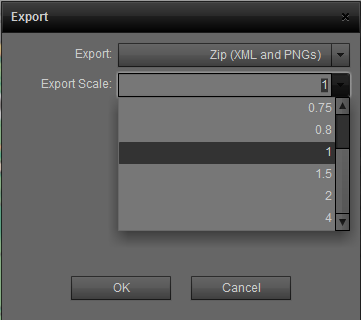
In this example, we choose "PNG (XML Merged)" and click "OK" to export the file "DragonWalk.png" into a selected directory.
Notice that there is only a single PNG file get exported? Yes. Because we choose the export form that combines both XML data and skeletal data, so this PNG file contains all the data needed by the skeletal animation.
In Export Scale dropdown box, you can set the scale of exported texture atlas to provide assets with different dimension for devices with different resolution.
Till now, as a designer, you have done all your work !
Tutorial 2: For programmers Use skeletal animation in ActionScript project
After designers export related assets and data into a predefined format file such as PNG or SWF, developers can use the skeleton animation library to import the file to program and control the characters to play. It is a very easy task with only a few steps! Following you will start to study how to use the skeletal animation library to render characters with traditional flash DisplayList or GPU base starling framework.
Download the Skeleton Animation Library, and import this project into your project. Let’s understand some basic concepts about skeletal animation before coding.
Factory: This is the basis for building skeletal animation. It is responsible for parsing the data from the imported file and preparing resources to create skeleton container, which is Armature.
Armature: We can consider it as a container which corresponds with a MovieClip exported from design panel in Flash Pro. Armature is responsible for skeleton management and playing animation.
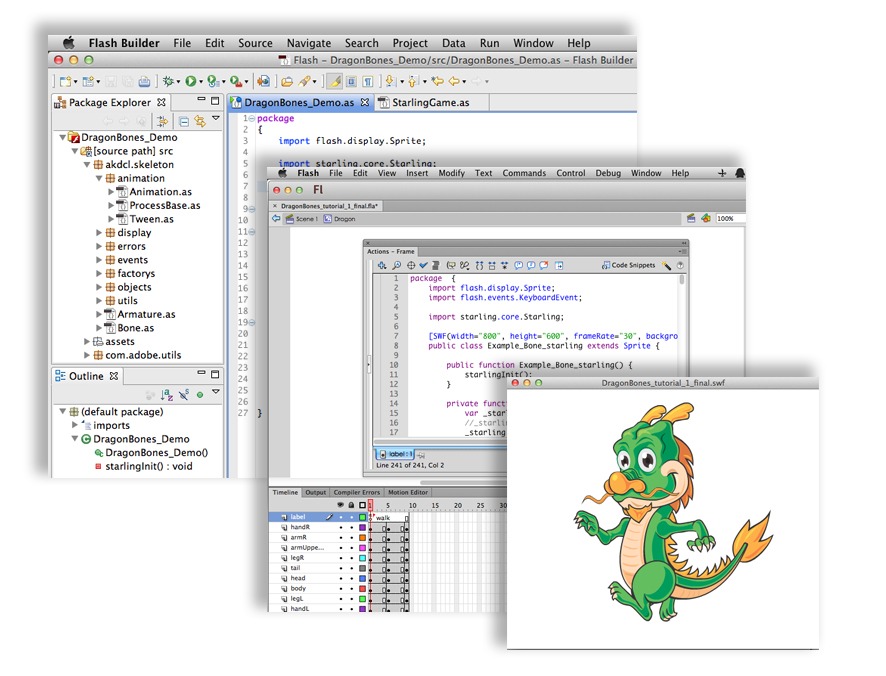
Now let's check out an example about how to create characters with traditional Flash DisplayList using skeleton animation library. Open the source code DB_Tutorial_Walk_DisplayList.as.
-
Firstly, import assets into your project.
                                    [Embed(source = "../assets/Dragon1.swf", mimeType = "application/octet-stream")]
                                    private static const ResourcesData:Class;
This asset is exported from Flash Pro skeleton animation design panel, merged with png data and XML data. Of course you can also dynamic import it after application launched.
-
Create factory and parse resource data from function "fromRawData", then do other things in callback function "textureCompleteHandler".
factory = new NativeFactory(); factory.addEventListener(Event.COMPLETE, textureCompleteHandler); factory.parseData(new ResourcesData()); -
In textureCompleteHandler, you need to create Armature with function "buildArmature":
armature = factory.buildArmature("Dragon");Add "armature.display" to stage.
addChild(armature.display as Sprite);Add armature to WorldClork for animation update:
WorldClock.clock.add(armature);Then, play some movement:
armature.animation.play("walk"); -
At last, call "WorldClock.clock.advanceTime(-1)" at ENTER_FRAME event handler.
Just the few lines of code, you can use skeleton animation in your own project. It is very cool, isn't?
Next we talk about how to create the skeleton animation in Starling. Starling is a famous 2D open-source framework powered by Stage3D which can help you build high quality games. For more information about Starling, please visit its official web site: http://starlingframework.org.
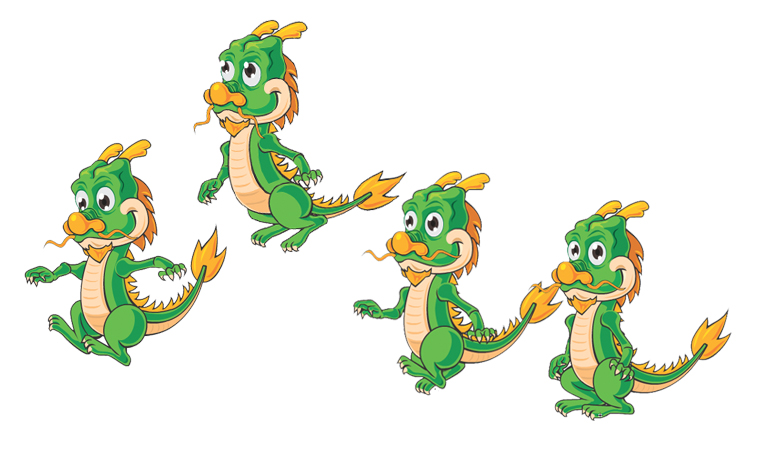
Some users probably have been familiar with the way of creating animations in Starling: using the Sprite Sheet. However, it is a serious problem of memory consumption, especially when processing complex animations. Look at the picture below, it's just a simple movement of walking, but takes up a big texture.
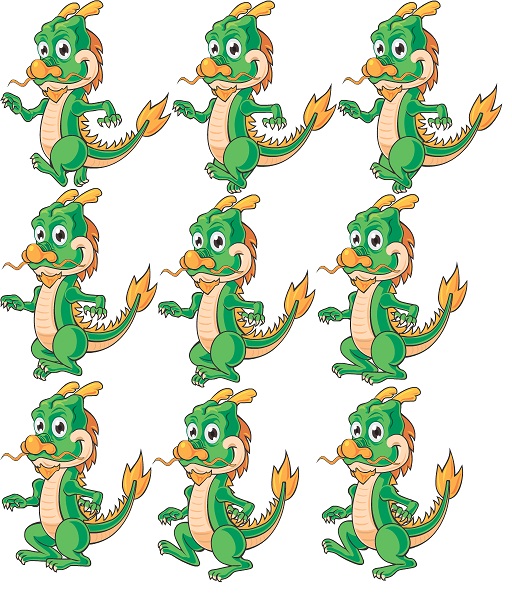
DragonBones have solved this problem. It can implement richer animation by using fewer assets (or textures).
DragonBones can work seamlessly with Starling, creating 2D skeleton animation which can be accelerated by GPU.
Open the DBStarlingWalk.as in the example project, you will notice that we create a special factory for Starling, the code like this:
factory = new StarlingFactory();
And the rest of the codes, they are the same with the previous DisplayList example.
For Starling framework, the embedded skeleton animation assets can be PNG format ( which include the xml data) or the SWF format( which also include the xml data). SWF assets store data as vector graph, and then Skeleton Animation Library will transform them to bitmap textures at runtime. This can help you reduce the size of your project.
Tutorial 3: Create and control multiple Skeleton animations
Next, you will learn how to use DragonBones to create skeleton animation including multiple movements, and control these actions by keyboard interaction.
-
Open file DragonBones_Tutorial_MultiBehavior.fla, then double click the Dragon Element in library, you can see four motions: stand, walk, jump and fail. Frame labels have been added in start frame of each motion, which is way for DragonBones design panel to distinguish different motion.
-
Open Skeleton animation design panel, there are multiple motions listed in Behavior List. You can set total frame, tween and detail parameter for single bone by choose one motion.
-
Please pay attention to the Blending Times option in Behavior editor window.
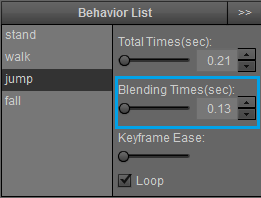
This option is the duration of transition movement from other motion to current one. E.g. we set Blending Times of jump movement is 0.13, then 0.13 seconds will be needed from other motion to this jump motion.
DragonBones will automatically add frames to make the transition smoothly. Also you can preview the transition effects in the preview panels.
Click "Export" button to export Skeleton animation data after you finished the adjustment of each movement.
-
Open file DBStarlingMultiBehavior.as, the code following demenstrate how to use keyboard to control Skeleton animation in Starling.
    package
    {
        import dragonBones.Armature;
        import dragonBones.animation.WorldClock;
        import dragonBones.factorys.StarlingFactory;

        import flash.ui.Keyboard;

        import starling.display.Sprite;
        import starling.events.EnterFrameEvent;
        import starling.events.KeyboardEvent;
        import starling.text.TextField;
        import flash.events.Event;


        public class DBStarlingMultiBehavior extends Sprite
        {
            [Embed(source = "../assets/Dragon2.png", mimeType = "application/octet-stream")]
            public static const ResourcesData:Class;

            private var factory:StarlingFactory;
            private var armature:Armature;
            private var armatureClip:Sprite;

            private var isLeft:Boolean;
            private var isRight:Boolean;
            private var isJumping:Boolean;
            private var moveDir:int=0;
            private var speedX:Number = 0;
            private var speedY:Number = 0;
            private var textField:TextField

            public function DBStarlingMultiBehavior()
            {
                factory = new StarlingFactory();
                factory.addEventListener(Event.COMPLETE, textureCompleteHandler);
                factory.parseData(new ResourcesData());

            }

            private function textureCompleteHandler(e:Event):void
            {
                armature = factory.buildArmature("Dragon");
                armatureClip = armature.display as Sprite;
                armatureClip.x = 400;
                armatureClip.y = 550;
                addChild(armatureClip);
                WorldClock.clock.add(armature);
                updateBehavior()
                addEventListener(EnterFrameEvent.ENTER_FRAME, onEnterFrameHandler);

                stage.addEventListener(KeyboardEvent.KEY_DOWN, onKeyEventHandler);
                stage.addEventListener(KeyboardEvent.KEY_UP, onKeyEventHandler);

                textField=new TextField(400,30,"A-move left,D-move right,W-jump","Verdana",16,0,true)
                textField.x=60;
                textField.y=2;
                addChild(textField);
            }

            private function onKeyEventHandler(e:KeyboardEvent):void
            {
                switch (e.keyCode)
                {
                    case Keyboard.A :
                    case Keyboard.LEFT :
                        isLeft=e.type == KeyboardEvent.KEY_DOWN;
                        break;
                    case Keyboard.D :
                    case Keyboard.RIGHT :
                        isRight=e.type == KeyboardEvent.KEY_DOWN;
                        break;
                    case Keyboard.W :
                    case Keyboard.UP :
                        jump();
                        break;
                }
                var dir:int;
                if (isLeft && isRight)
                {
                    dir=moveDir;
                    return;
                }
                else if (isLeft)
                {
                    dir=-1;
                }
                else if (isRight)
                {
                    dir=1;
                }
                else
                {
                    dir=0;
                }
                if(dir==moveDir)
                {
                    return;
                }
                else
                {
                    moveDir=dir;
                }
                updateBehavior()
            }

            private function onEnterFrameHandler(_e:EnterFrameEvent):void
            {
                updateMove();
                WorldClock.clock.advanceTime(-1);
            }

            private function updateBehavior():void
            {
                if (isJumping)
                {
                    return;
                }
                if (moveDir == 0)
                {
                    speedX = 0;
                    armature.animation.gotoAndPlay("stand");
                }
                else
                {
                    speedX=6*moveDir;
                    armatureClip.scaleX = -moveDir;
                    armature.animation.gotoAndPlay("walk");
                }
            }
            private function updateMove():void
            {
                if (speedX != 0)
                {
                    armatureClip.x += speedX;
                    if (armatureClip.x < 0)
                    {
                        armatureClip.x = 0;
                    }
                    else if (armatureClip.x > 800)
                    {
                        armatureClip.x = 800;
                    }
                }
                if (isJumping)
                {
                    if (speedY <= 0 && speedY + 1 > 0 )
                    {
                        armature.animation.gotoAndPlay("fall");
                    }
                    speedY += 1;
                }
                if (speedY != 0)
                {
                    armatureClip.y += speedY;
                    if (armatureClip.y > 540)
                    {
                        armatureClip.y = 550;
                        isJumping = false;
                        speedY = 0;
                        updateBehavior();
                    }
                }
            }
            private function jump():void
            {
                if (isJumping)
                {
                    return;
                }
                speedY = -25;
                isJumping = true;
                armature.animation.gotoAndPlay("jump");
            }
        }
    }
You can find that whenever you want to play the Skeleton animation, just call function armature.animation.gotoAndPlay()

Not only the motion name, but also the total frame number and loop also can be specified dynamically by call this function.
DragonBones provide various events for each animation:
Movement change event:
armature.addEventListener(dragonbones.events.Event.MOVEMENT_CHANGE, aramtureEventHandler);
Movement start event:
armature.addEventListener(dragonbones.events.Event.START, aramtureEventHandler);
Movement complete event
armature.addEventListener(dragonbones.events.Event.COMPLETE, aramtureEventHandler);
Movement loop complete event:
armature.addEventListener(dragonbones.events.Event.LOOP_COMPLETE, aramtureEventHandler);
You can easily create games including complex roles by various events and movement.
Tutorial 4: Control each bone in the skeleton annimation
For an interesting game, perhaps it is not enough to just play the predefined skeleton animations, for example we want the characters to have their own dynamic and controllable movements. To our great joy, DragonBones provides the mechanism to access and control each bone of the skeleton, which can make the characters free to do all kinds of motions.
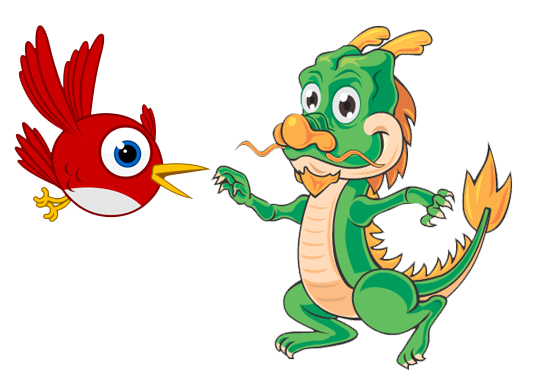
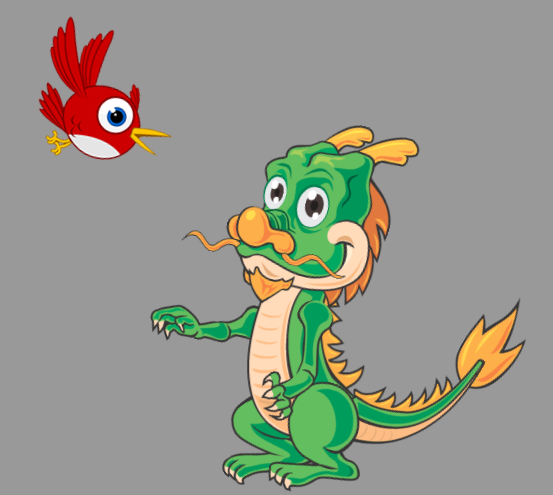
In this example, the skeleton is controlled by the mouse movement in the scene. We create a bird that will follow the mouse movement and maintain a certain distance with the dragon. At the same time, the dragon's head and arms will follow the bird movement and make a variety of poses. It sounds funny, right?
Let's open the file DBStarlingControlBone.as and below is the corresponding code:
    package
    {
        import dragonBones.Armature;
        import dragonBones.Bone;
        import dragonBones.animation.WorldClock;
        import dragonBones.factorys.StarlingFactory;

        import flash.geom.Point;
        import flash.ui.Mouse;

        import starling.display.Image;
        import starling.display.Sprite;
        import starling.events.EnterFrameEvent;
        import starling.events.TouchEvent;
        import starling.textures.Texture;
        import flash.events.Event;


        public class DBStarlingControlBone extends Sprite
        {
            [Embed(source = "../assets/Dragon2.png", mimeType = "application/octet-stream")]
            public static const ResourcesData:Class;

            [Embed(source = "../assets/starling.png")]
            private static const starlingImg:Class;

            private var factory:StarlingFactory;
            private var armature:Armature;
            private var armatureClip:Sprite;

            private var mouseX:Number = 0;
            private var mouseY:Number = 0;
            private var moveDir:int=0;
            private var dist:Number;
            private var speedX:Number = 0;
            private var starlingBird:Image;
            private var _r:Number;

            private var _head:Bone;
            private var _armR:Bone;
            private var _armL:Bone;

            public function DBStarlingControlBone()
            {
                factory = new StarlingFactory();
                factory.addEventListener(Event.COMPLETE, textureCompleteHandler);
                factory.parseData(new ResourcesData());
            }
            private function textureCompleteHandler(e:Event):void
            {
                armature = factory.buildArmature("Dragon");
                armatureClip = armature.display as Sprite;

                armatureClip.x = 400;
                armatureClip.y = 550;
                addChild(armatureClip);
                WorldClock.clock.add(armature);
                updateBehavior(0)
                addEventListener(EnterFrameEvent.ENTER_FRAME, onEnterFrameHandler);
                stage.addEventListener(TouchEvent.TOUCH, onMouseMoveHandler);

                starlingBird=new Image(Texture.fromBitmap(new starlingImg()))
                addChild(starlingBird);
                Mouse.hide();
                //get the bones which you want to control
                _head = armature.getBone("head");
                _armR = armature.getBone("armUpperR");
                _armL = armature.getBone("armUpperL");

            }

            private function onEnterFrameHandler(_e:EnterFrameEvent):void
            {
                checkDist();
                updateMove();
                updateBones();
                WorldClock.clock.advanceTime(-1);
            }

            private function checkDist():void
            {
                dist = armatureClip.x-mouseX;
                if(dist<150)
                {
                    updateBehavior(1)
                }
                else if(dist>190)
                {
                    updateBehavior(-1)
                }
                else
                {
                    updateBehavior(0)
                }

            }

            private function onMouseMoveHandler(_e:TouchEvent):void
            {
                var _p:Point = _e.getTouch(stage).getLocation(stage);
                mouseX = _p.x;
                mouseY = _p.y;
                starlingBird.x=mouseX-73;
                starlingBird.y=mouseY-73;
            }
            private function updateBehavior(dir:int):void
            {
                if(moveDir==dir)return;
                moveDir=dir;
                if (moveDir == 0)
                {
                    speedX = 0;
                    armature.animation.gotoAndPlay("stand");
                }
                else
                {
                    speedX=6*moveDir;
                    armature.animation.gotoAndPlay("walk");
                }
            }
            private function updateMove():void
            {
                if (speedX != 0)
                {
                    armatureClip.x += speedX;
                    if (armatureClip.x < 0)
                    {
                        armatureClip.x = 0;
                    }
                    else if (armatureClip.x > 800)
                    {
                        armatureClip.x = 800;
                    }
                }
            }
            private function updateBones():void
            {
                //update the bones' pos or rotation
                _r = Math.PI + Math.atan2(mouseY - armatureClip.y+armatureClip.height/2, mouseX - armatureClip.x);
                if (_r > Math.PI)
                {
                    _r -= Math.PI * 2;
                }
                _head.node.rotation = _r*0.3
                _armR.node.rotation = _r *0.8;
                _armL.node.rotation = _r * 1.5;

                starlingBird.rotation=_r*0.2;
            }
        }
    }
From the above code, we can find that method dragonBones.Armature.getBone(_name:String):Bone is used to get one specific bone. The node object of the bone contains the data, such as position, rotation, scale, skew and etc. We can assign values to these parameters based on the game logic needs, to achieve the effect of dynamic bone controlling.
Please pay attention to the updateBones() method in the above example, where we first fetch the angle between the mouse's current position and the central point of the skeleton, then change the rotations of the dragon's head and arms based on this angle, thus realize this interesting effect.
Tutorial 5: Switching texture in skeleton animation
It is very a common request in the game to switch texture for some effects like changing clothes, equipments or weapons for a certain characters, and this is very easy to get done by switching the corresponding bone texture in the DragonBones Animation library.
Through the mechanism of switching the bone texture, we can create new texture and bind it with the corresponding bones dynamically. The new texture can be obtained from external files that are created by other means, or from Texture Atlas that is exported from the design panel. You may have one question for now, how Flash Pro can export the texture that does not included in the timeline animation texture?
-
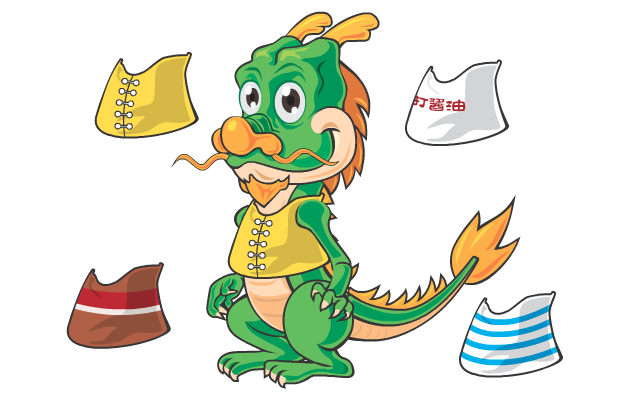
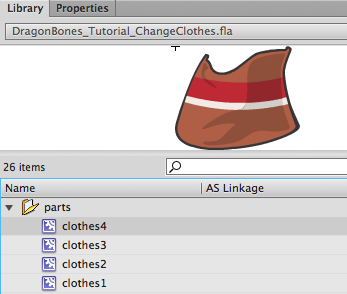
Open the sample file DragonBones_Tutorial_ChangeClothes.fla in this tutorial, and you will see the lovely dragon wear a yellow jacket with various actions that are designed on the layer called clothes.
-
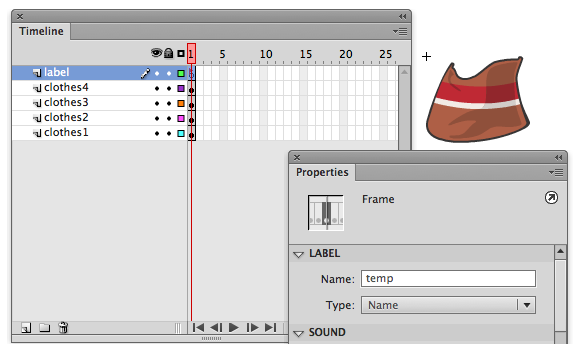
Double click clothTextureTemp element, you will find that there have 4 clothes on the different layers with its associated names, and due to the identical size and shape, they overlap each other. However, in the actual project, the clothes or weapons may have various size, so it is necessary to set the appropriate relative coordination to its original texture.
Please note that the first frame label is named as "temp". The design panel won't import animation element that do not have frame label.
-
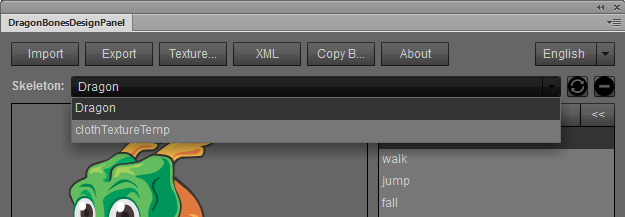
Select the "Dragon" and "clothTextureTemp" elements in the library, then open the design panel and click "import" button with only selected elements option, you will find that there has a skeleton named clothTextureTemp in the Armature List , which contains clothes1 to clothes4 bones. You don't need worry them now, they are not for designing purpose, but to export them with the whole skeletal texture as one piece.
-
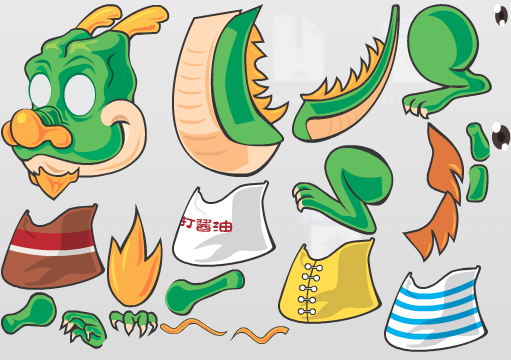
Next you can make some necessary adjustment for the skeletal structure if needed, and then click "Export" button to export all the texture -- a DragonWithClothes.png file contains both image and xml data. You will find that the exported texture atlases contain all clothes we need. :)
-
Let's get a close look at how to switch texture in the code. Open DBStarlingMultiBehavior.as file that is created in Tutorial 3, we can add switch texture code here directly. First, rename the imported texture to DragonWithClothes.png:
[Embed(source = "../assets/DragonWithClothes.png", mimeType = "application/octet-stream")] -
Then add 2 variables , Array textures contains the all the texture names, and int textureIndex is the index to select various texture when switch them.
                                    private var textures:Array = ["parts/clothes1", "parts/clothes2", "parts/clothes3", "parts/clothes4"];
                                    private var textureIndex:int = 0;
Please note that it is "parts/clothes1", not "clothes1". This is because that Flash Pro can have same element name under different folder, so DragonBones saved the path info which contains the directory. You will understand it when you see the directory that has clothes element in the library when you open DragonBones_Tutorial_ChangeClothes.fla
-
Create handler function that responses the key event (press C key), which is used to change texture.
case Keyboard.C: if (e.type == KeyboardEvent.KEY_UP) { changeClothes(); } break; -
Create changeClothes() function:
    private function changeClothes():void {
        //loop the texture
        textureIndex++;
        if (textureIndex >= textures.length) {
            textureIndex = textureIndex - textures.length;
        }
        //get the image instant from textureData
        var _textureName:String = textures[textureIndex];
        var _image:Image = factory.getTextureDisplay("_textureName") as Image;
        // assign image to bone.display for chaging clothes effect. (using bone.display to dispose)
        var _bone:Bone = armature.getBone("clothes"); _bone.display.dispose();
        _bone.display = _image;
    }
Here we have used dragonBones.factorys.StarlingFactory.getTextureDisplay(_textureData: TextureData, _fullName:String):Image to obtain the texture from the design panel exported file , then assign to corresponding bone to make the changing clothes effect. As mentioned the before, the texture can be also obtained from external resource as needed.
When you get familiar with DragonBones library, you can have more flexible implementation. For example, in addition to change bones’texture, you can also add, delete, update skeleton structure in Armature dynamically.
OK, you should know how to dynamically change the texture for your game’s characters, try it now! :)